How to use Workflow Constants as Environment Information
After showing how workflow constants can help you with environment information in my last post How to Handle Environment Variables with Nintex Workflow, I am going to explain how workflow constants can be used in your deployment scripts.
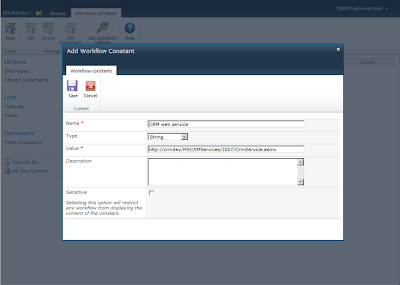
Starting of we create a workflow constant at website level. Therefore go to the Site Settings of the site where you want to use the workflow constant, then select Manage workflow constants under Nintex Workflow. Select New from the ribbon and create a workflow constant with the following settings:
Then open the command prompt and switch to the Nintex Workflow 2010 install folder. (Typically: C:\Program Files\Nintex\Nintex Workflow 2010). In order to export the workflow constant you have just created enter the following command:
The output file wfconst_dev.xml contains all workflow constants which do exists at the selected site. As you can guess by the file extension this is a XML which can be edited. Opening the XML you will see something like this:
You can change the URL of the web service in line 9 to http://crmtest/MSCRMServices/2007/CrmService.asmx in order to have the correct setting for the test environment. When you save the changed file save it as wfconst_test.xml. Usually I have a file with workflow constants for every environment:
With the following command you can import the file with the workflow constants into your target environment:
This should take care of most aspects you have to consider for configuration management.
Starting of we create a workflow constant at website level. Therefore go to the Site Settings of the site where you want to use the workflow constant, then select Manage workflow constants under Nintex Workflow. Select New from the ribbon and create a workflow constant with the following settings:
 |
| click to enlarge |
Then open the command prompt and switch to the Nintex Workflow 2010 install folder. (Typically: C:\Program Files\Nintex\Nintex Workflow 2010). In order to export the workflow constant you have just created enter the following command:
1: nwadmin -o ExportWorkflowConstants -siteUrl [url to your site] -outputFile wfconst_dev.xml -includeSite
The output file wfconst_dev.xml contains all workflow constants which do exists at the selected site. As you can guess by the file extension this is a XML which can be edited. Opening the XML you will see something like this:
1: <?xml version="1.0"?>
2: <ArrayOfWorkflowConstant>
3: <WorkflowConstant>
4: <SiteId>662cb00b-6401-4a66-af25-8e33982bacbd</SiteId>
5: <WebId>a37b2ecd-d760-41ef-a3dc-a20c633e2480</WebId>
6: <Id>3</Id>
7: <Title>CRM web service</Title>
8: <Description/>
9: <Value>http://crmdev/MSCRMServices/2007/CrmService.asmx</Value>
10: <Sensitive>false</Sensitive>
11: <Type>String</Type>
12: <AdminOnly>false</AdminOnly>
13: </WorkflowConstant>
14: </ArrayOfWorkflowConstant>
You can change the URL of the web service in line 9 to http://crmtest/MSCRMServices/2007/CrmService.asmx in order to have the correct setting for the test environment. When you save the changed file save it as wfconst_test.xml. Usually I have a file with workflow constants for every environment:
- wfconst_dev.xml
- wfconst_test.xml
- wfconst_prod.xml
With the following command you can import the file with the workflow constants into your target environment:
   1:  nwadmin -o ImportWorkflowConstants -siteUrl [url to your site]
-inputFile wfconst_test.xml -handleExisting Overwrite -includeSite
This should take care of most aspects you have to consider for configuration management.


Looking you are a software specialist....
ReplyDelete