Integrating Nintex Workflow with Twitter Pt. 2
This is the second part in the series Integrating Nintex Workflow with Twitter. Please go to part 1 to see the full story.
In the first part of this series we have created a content News Page, a page layout and deployed the feature to a SharePoint Publishing site. The page has an extra field which is used to enter the message sent to Twitter.
This part covers the workflow which is used to tweet the availability of a new News Page. In order to get the following to work you need Nintex Workflow 2010 with Nintex Live enabled. (If you want to know how enable Nintex Live take a look at the Installation Manual which can be found on Nintex's Support Pages.)
Step 1: Creating the Workflow
The workflow for this scenario should be executed everytime a new page with version 1.0 of our content type is approved. Consequently, for updates to the content no tweet is sent. Nintex offers the possibility to hook into the item changed event for list workflows. Therefore go to the library Pages of your publishing site and create a new Nintex Workflow.


Step 2: Add Actions from Nintex Live Catalog
Nintex provides the activities Google URL shortener and Twitter Tweet through the Live Catalog. (The Nintex Live functionality is a seperate feature which has to be activated on the current site collection.) Open the catalog from the ribbon.


Then use the search function to locate Twitter Tweet as well as Google URL shortener and add both activities.

After adding both activities your workflow activity catalog looks like this:

After adding both activities your workflow activity catalog looks like this:

Step 3: Configuring the URL shortener
Add the activity Google URL shortener to your workflow and configure it as shown below. The workflow variable Item URL shortened, in which the shortened URL is saved, has the type Single line of text.

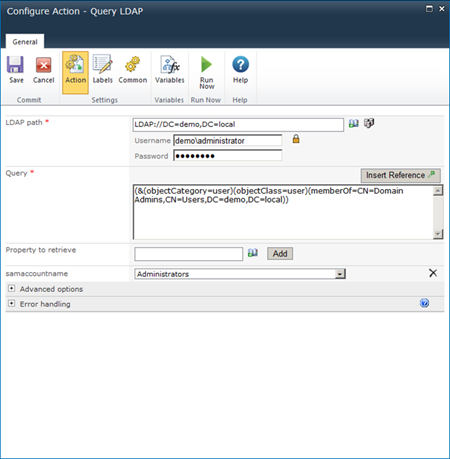
Step 4: Configuring Twitter Tweet
All you need now is the activity Twitter Tweet. Add it to the workflow and configure it as shown in the image.

Enter as Authorizing User someone who can approve Nintex Live's access request to your company's Twitter account. As Twitter text we set the content of the field TWITTERMESSAGE from the content type News Page as well as the shortened URL.
Open the dialog Conditional Startup Options by clicking on the button Conditions. Configure the conditions in the following way:

Close the dialog by clicking on Save. Set the name of the workflow to Twitter about News Page.Your workflow settings should look like this:

Close the workflow settings by hitting on Save then publish the workflow.
Step 4: Configuring the Startup Options
We want to run this workflow after a page based on the content type News Page was approved for the first time, i.e. Version 1.0. Subsequent updates to the content should not trigger further tweets. Therefore open the workflow settings and set the following start up options:
- Uncheck Start manually
- Set Start when items are modified to Conditional
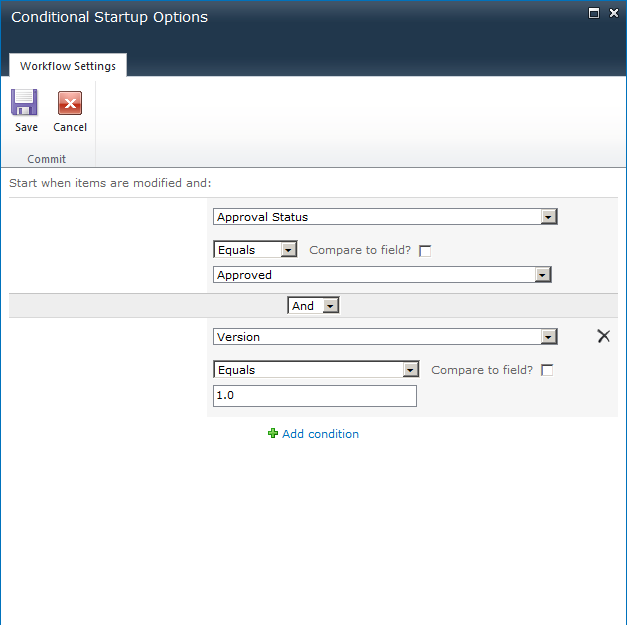
Close the dialog by clicking on Save. Set the name of the workflow to Twitter about News Page.Your workflow settings should look like this:

Close the workflow settings by hitting on Save then publish the workflow.
Conclusion
In this post you have created a workflow which tweets the availability of a News Page. Next week's post is about the experience of the News editor and how the result looks like on Twitter.
Complete code from this week is available on codeplex: http://vsanner.codeplex.com, Project: 2013-01 SocialMedia-2


Comments
Post a Comment