Posts

Showing posts with the label Nintex Workflow 2010

Integrating Nintex Workflow with Twitter Pt. 2

Image
This is the second part in the series Integrating Nintex Workflow with Twitter . Please go to part 1 to see the full story. In the first part of this series we have created a content News Page,  a page layout and deployed the feature to a SharePoint Publishing site . The page has an extra field which is used to enter the message sent to Twitter. This part covers the workflow which is used to tweet the availability of a new News Page . In order to get the following to work you need Nintex Workflow 2010 with Nintex Live enabled. (If you want to know how enable Nintex Live take a look at the Installation Manual which can be found on Nintex's Support Pages .) Step 1: Creating the Workflow The workflow for this scenario should be executed everytime a new page with version 1.0 of our content type is approved. Consequently, for updates to the content no tweet is sent. Nintex offers the possibility to hook into the item changed event for list workflows . Therefore g...
Integrating Nintex Workflow with Twitter Pt. 1

Image
Overview One common scenario for corporate Internet sites is to sent notifications when a new article is published via social networks to their followers. With the availability of Nintex Live it became possible to twitter a tweet. In one of the later versions a similar activity for Yammer  became available. In this post I will show how you can use the "Twitter a Tweet" activity to notify your Twitter followers about new articles. This is going to be a two part series. In the first part I will create a News Page content type and page layout. In the second part I will show you the workflow which ensures that every time a News Page was approved the notification is sent to Twitter. Step 1: Content Type News Page In order to get started open Visual Studio 2010 and create an empty SharePoint project. Then add a new content type to this project based on Page . Modify the added content type to look like the this: 1: <!-- Parent ContentType: Page (0x010...

How to use Workflow Constants as Environment Information

Image
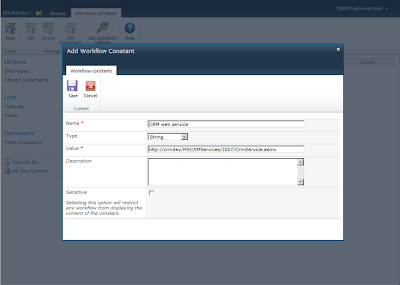
After showing how workflow constants can help you with environment information in my last post  How to Handle Environment Variables with Nintex Workflow , I am going to explain how workflow constants can be used in your deployment scripts. Starting of we create a workflow constant at website level. Therefore go to the Site Settings  of the site where you want to use the workflow constant, then select Manage workflow constants under Nintex Workflow.  Select New from the ribbon and create a workflow constant with the following settings: click to enlarge Then open the command prompt and switch to the Nintex Workflow 2010 install folder. (Typically: C:\Program Files\Nintex\Nintex Workflow 2010) . In order to export the workflow constant you have just created enter the following command: 1: nwadmin -o ExportWorkflowConstants -siteUrl [url to your site] -outputFile wfconst_dev.xml -includeSite The output file  wfconst_dev.xml contains all workflow c...

How to Handle Environment Variables with Nintex Workflow

Image
A topic you sure will run across is how to handle environment variables when you deploy workflows designed with Nintex Workflow. The values are by definition just valid for one specific environment, and have to be changed in order to deploy the workflow into another environment. Example for environment variables are URLs of web services or service accounts, which are different between development, test and production system. Basically, there are three ways how you can handle this information: store the information within the workflow activity create a workflow variable create a workflow constant Most people start with alternative 1 . The environment specific information is directly configured on the workflow activities. This has one advantage: You are pretty fast when you configure the activities the first time. But in the long run the disadvantages outweigh. After deploying the workflow from environment to the next stage, you have to update all affected activities. Beside th...

How long does "Delay for..." really wait?

Image
First looking at the action "Pause for..." I was thinking think that I could configure the delay period precisely to the minute. However, when I used this activity I discovered that the activity did not behave as I as expected. This was especially true when I entered an interval shorter than five minutes. I always waited longer than configured. Looking deeper, I found out that the cause for this is the SPTimerJob job-workflow  which controls the triggers for " Pause for... ". This timer job runs with the standard configuration every five minutes. If you set " Pause for... " to a shorter interval, the trigger send by the timer job will be sent every five minutes anyway. The same applies when you set the action to pause the workflow for any period of time that lies between the configured schedule for job-workflow . Of course, an option to solve this issue is to reconfigure the timer job to run in shorter intervals. But ask yourself if this is really nece...

Run Now in Nintex Workflow 2010

Image
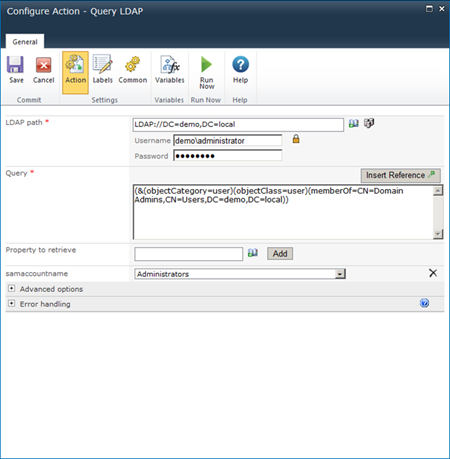
With version 2.3 Nintex introduced Run Now into Nintex Workflow 2010. Nintex promises that with Run Now the integration with other system will be easier, because workflow designers can test actions with Run Now support already during the design stage. It is not necessary to start and step through the workflow until you reach the actions. Can it keep up to the promise? Run Now can be accesed on all supported actions during the workflow design stage. Start with a new blank workflow and then drag an integration action into the design area. I will be using Query LDAP for the rest of this post. The other actions work alike. After you have configured the action select "Run Now" in the ribbon. A new window is displayed where you can test the configuration. If you are using workflow variables for the configuration you can replace them with actual values. And remember: As soon as you press execute the target system will behave as if you execute the action from the workfl...